Showing posts with label Vegetarian. Show all posts

Thursday, June 30, 2011

Fun with Bok Choy

I'm still wading through my CSA box and have miraculously used up most of the lettuce, spinach, garlic scapes, and rhubarb. But today is Thurday - which is almost Friday - which means another CSA box to tackle!

Tonight (and lunch and dinner tomorrow) I'm endeavoring to use up all of the bok choy.

Of course I will be making a stir fry (typical and unimaginative, I know, but I really like stir fry for using up lots of veggies) and I'll also be making Spicy Thai Soup.

I wish I could give credit to whoever came up with the soup recipe, but it's one of those photo copies that has been lying around the house for eons. It may well have come from Alice (my step-mom, kinda) or it may have come from a Jane Brody or Moosewood cookbook. I really have no way of knowing.

In any case, I've had a summer cold that will not go away and soup sounds like a wonderful idea to me - even though it has been in the high 80s this week.

If you're looking to use up a little bok choy like I am or if you are in the mood for Thai, I hope you'll give this a try.

You will need:
1 TBSP finely chopped fresh ginger
(I just use a micro-plane because I'm too lazy to chop it)
4 cups vegetable broth
2 tsp minced garlic
1 jalapeno pepper, seeded and finely chopped
(you could use just half if you don't like the heat)
1 cup sliced mushrooms of your choice
1 cup broccoli florets
(cut into bite-sized pieces...you don't want a knife with your soup)
1 cup finely chopped bok choy
1 green onion, finely chopped
1 TBSP finely chopped fresh cilantro

Place broth, ginger, garlic, and jalapeno in a pot and bring to a boil.

Add mushrooms and simmer for 2 minutes.

Add broccoli and bok choy. simmer until the broccoli is tender but still bright green and crisp - about 3 to 4 minutes. Do not overcook!

Stir in green onion and cilantro and serve immediately.

Enjoy!

Wednesday, June 29, 2011

Light, Bright, Citrus Dressing

Remember that CSA I talked about in my last post

Well, it has blessed me with an overabundance of lettuce.

Seriously, there is only so much you can do with lettuce!

I've tried pawning it off onto unsuspecting guests, I've made filling for numerous lettuce wraps, and I'm wading my way through troughs of salad.

The good news here is that having a truck load of salad greens means that I'm getting to try our a bunch of salad dressing recipes that I've been meaning to get around to.

Now I know that salad is the LAST thing you want to see on a vegan blog but I promise that I wouldn't share any salad with you if it weren't absolutely amazing...and this dressing truly is!

It's light and refreshing. It's bright and citrus-y. It's dressing but it blends in so well with your salad that it doesn't taste like you've covered it in dressing!

Because I have so much salad I made a giant amount of this dressing, stuck it in a canning jar, and popped it into the fridge for future use. Please feel free to half the recipe for smaller mountains of lettuce.

You will need:
1/2 cup orange marmalade
(I used organic orange preserves - my market didn't have orange marmalade)
1/4 cup lemon juice or 2 lemons, juiced
4 tsp Dijon mustard
2/3 cup extra virgin olive oil
salt and pepper to taste
(I used about 1 1/2 tsp salt and a generous amount of freshly ground black pepper)

Whisk all of your ingredients together using a fork and voila! Your dressing is ready.

I will warn you that if you use orange preserves like I did, the dressing looks completely unappetizing - it's lumpy and clumpy and kind of gross looking. Trust me - you want to get past this initial gross-out factor because it tastes marvelous!

Wednesday, June 22, 2011

Cheesy Vegan Popcorn

 I have a sweet tooth like you would not believe. Even more pronounced, however, is my love for all things salty.

Since the chocolate chip cookies haven't been cutting it lately, I turned to my old standby: popcorn.

It's been kind of hectic the last few days and when that happens, I tend to snack or graze more than stop and have a full meal. 

To satisfy my grumbly belly the other day I popped up a bag of microwave popcorn (the kind with no butter).  Immediately upon finishing, I ripped open the steaming hot bag and tossed in a tablespoon of nutritional yeast. Then, shake-n-bake style I shook it all together to coat.

The result was popcorn that was cheesy and salty without any guilt, animal products, or extra fat.

I highly suggest you try this for your next snack or movie night!

Saturday, June 11, 2011

Old Bay

I know, I know, I've been away for a while. I've been trying a ton of new recipes and, mostly, failing miserably. 

The thing is, when you try new recipes - other people's recipes - you have to take a leap of faith that they'll actually be worth eating once you've finished the dish. Lately, I've been choosing some real failures....but more on that later, I promise.


Today I discovered Old Bay Seasoning, largely thanks to this recipe for seitan chicken from Vegan Yum Yum (go buy the cookbook - the recipes and the photography are great and she does a wonderful job guiding even the novice cook through recipes to find success).

I have heard of old bay before but mostly associated with seafood. It's not the kind of thing I grew up with and I have always thought of it as a regional spice blend...you know, from the south. I grew up eating cuisine form all over the country and the world but, for whatever reason, southern food was a complete mystery to my household.

Grits were mushy and flavorful at best, everything else was fried, and it left a lot to be desired. It was not until earlier this year that I had ever purchased, let alone cooked, greens.

So, as a very recent convert to southern cooking I thought I'd give the southern fried seitan a shot.

BOY OH BOY WAS I SURPRISED!

I have a wonderful recipe for seitan "chicken" that I modified from Vegetarian Carnivore's recipe and I use it all the time but this new recipe that is built around Old Bay totally blew my mind! And here I thought I only needed ONE seitan "chicken" recipe.

I made the seitan as directed but then added my own little twist at the end.

I butterflied the seitan "cutlets" and stuffed them with a mixture of caramelized onions, sauteed mushrooms, parsley and goat cheese (more on that later, too, I swear).

The result was utterly fantastic. I highly suggest you try it!

Incidentally, I served it with fiddle head ferns in a lemon garlic sauce and a side of couscous. It was one of the best meals I've made in a really long time. I'll post the lemon garlic sauce recipe later and also the fantastic peach cake that I made for dessert, which is quickly becoming my favorite dessert and overtaking my beloved linzor torte.

Friday, May 27, 2011

I need summer NOW

I am jonesing for summer in a bad way.

Thanks to weeks of rainy, unseasonably cold weather, I am craving food on the grill, corn on the cob, long days spent at the beach, and hot summer nights with friends enjoying a couple of beers on the deck at our favorite local hangout.

I live in the frozen white north, so this time of year makes me crave food I don't get to eat the rest of the year....lately that's been s'mores.
Ever since my post on S'More Cupcakes, I have had my sight locked onto these sweet, gooey delights. I am dying for all of this rain to end so I can get out therewith friends and roast some of these up over a fire! 
When the day finally comes that the clouds roll away and it's dry enough to start a fire, I will be ready! I recently discovered that I don't have to kill myself making vegan marshmallows from scratch - instead I can buy Dandies Vegan Marshmallows!


They're vegan, gluten free, and gelatin free! Now I'm sure that tons of you veggies out there already know all about these little guys but I am new to the scene. I cannot tell you  how happy I was to stumble upon these when poking around online for recipes to make my own vegan marshmallows. I literally squealed with joy!

Another fun reason I'm dying to make s'mores?

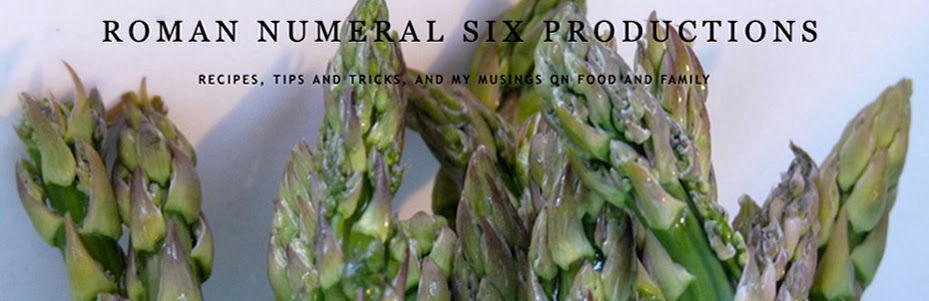
I've had this post for a do-it-yourself S'Mores Bar from Birthday Girl Blog bookmarked for ages. 
Don't those combinations sound like fun? Yes, I realize that vegan-izing some of them could be a real challenge but after finding a vegan marshmallow alternative, I'm ready to tackle pretty much any of them!

Hopefully summer will arrive soon so I can have a little soiree!

Download PDFs of S'mores Bar Party here

Wednesday, May 25, 2011

Citrus-Cilantro Pesto

In case I have not already expressed this, I have the best job ever. Not only because I love what I do, but because I have an office full of people who love to eat and share recipes!

My boss recently gave me this recipe for citrus-cilantro pesto over pasta and vegetables and it is as delicious as it is quick and easy to make! I have absolutely no idea where this recipe came from, so I can't site any source....although I should find out because I bet whichever cookbook it came from is pretty fantastic.

My favorite thing about this recipe is that the sauce and veggies all come together in the time it takes your pasta to cook, so the whole thing is ready and on the table in under 15 minutes.
You will need:
1 lb pasta, like whole wheat spaghetti
2 small zucchini
1 bag of shredded carrots
2 seedless oranges
2 cups cilantro (leaves only!)
2-3 cloves of garlic
2 tsp dry mustard
2 tsp red pepper flakes
1/2 tsp salt
1/2 cup olive oil
1/2 cup pasta water from cooking your pasta
(I actually use about 1/4 cup because I like a thicker pesto, but you can do whatever you like)
salt and pepper to taste

To start, cook the pasta according to the package directions.

While your pasta is cooking, wash your zucchini and cut into lengthwise strips, as thin as you can get them and as long or short as you like. I like mine really thin and really long so they mimic the pasta.

when the pasta has just two minutes left to cook, toss in the zucchini and carrots. This will help to cook your veggies just enough so that they're not rock solid but not total mush, either.

Once your pasta is done, turn off the heat and remove 1/2 cup of water before straining the pasta and veggies. 

As your pasta is cooking, prep your pesto!

Cut the peels off of the two seedless oranges. Try not to lose too much of the orange flesh, just trim off the peel and the white pith. Cut them into quarters and place in your blender. Add the garlic, spices and salt, and the cilantro. Next add the pasta water and oil and blend until smooth. You'll see little flecks of green from the cilantro that just won't get any smaller or incorporate into the sauce like you want. This is totally normal. 

Return the cooked pasta and veggies to the hot pot. Pour the pesto over the pasta and veggies and mix to coat the pasta evenly.

I like to serve in white bowls, sprinkled with a little freshly ground black pepper and cilantro for garnish.

I have added pea pods, asparagus, and peppers to this and they're all wonderful. I hope you'll play with the recipe a bit and make it your own.

Monday, May 23, 2011

Breakfast Sandwich

Two things you should know about me:
1. Breakfast is my favorite meal and I could eat it three times a day
2. I will eat just about anything in sandwich form.

Now that we have that out of the way, let me introduce you to a delightful little breakfast sandwich. This has become one of the boyfriend's favorites and he requests it any time he comes over before we head to church. This is the kind of breakfast that makes you feel like you've spent a lot of time on it, but it is really quick and easy to whip together. It's so easy, in fact, that I usually indulge him and throw a sandwich together before we hit the road.


You will need:
2 slices of the bread of your choice
(I use Ezekiel 7 Sprouted Grain Bread)
1-2 TBSP Earth Balance margarine
2-3 slices of Smart Bacon
1/3 - 1/2 inch thick slice of tofu cut from 1 block of extra firm tofu
(cut it the long way and you can get 4 slices out of one block)
1 slice of dairy-free cheese
a few slices of tomato


First, melt the Earth Balance in your pan on medium heat. Salt and pepper your tofu on both sides and sautée the tofu in the Earth Balance until golden on one side. 

I know I have said before that tofu by itself has ZERO flavor, but trust me when I tell you that cooking it in Earth Balance with a little salt and pepper makes it taste so buttery and delicious that you'll think you're eating something seriously decadent and unhealthy!


In case you don't already have a mesh screen, you should really invest in one - it'll keep hot oil and margarine from splattering all over your kitchen and burning you while you tend to the pan.


After a few minutes, turn the tofu over. Add the bacon to the pan and continue to sautée until the tofu is golden on both sides and the bacon is crispy on the edges. The tofu only takes a few minutes so while your tofu and bacon cook, toast your bread so it'll be ready when the tofu is done.

Once cooked, remove the tofu and bacon from the pan and place on a plate covered with a few paper towels. Even though you're not using a ton of Earth Balance, you don't want to have slimy, greasy tofu.

Assemble your sandwich as you please, with toast, tofu, bacon, and dairy-free cheese. Sometimes I'll even spread a little hommus onto one of the slices of toast because I like the flavor and extra moisture it adds.

If you've recently decided against eating meat or are just looking for a low-cholesterol option, give this a shot. Between the bacon and the tofu smothered in Earth Balance, you won't feel for a moment like you're missing out on anything.

Happy eating!

Friday, May 20, 2011

Lasagna with Roasted Cauliflower Ricotta & Spinach

Right after deciding to try the vegan lifestyle, Betsy, a friend of mine from work, turned me on to Isa Chandra Moskowitz.

She's the chef behind Veganomicon and Appetite for Reduction.

The thing about her recipes is that they are the kinds of recipes that make you feel like you're totally not eating vegetables - they both fool and satisfy!

I've made her recipe for lasagna several times and, at this point, I now use only her recipe as a guide for the roasted cauliflower ricotta. Her recipe calls for you to layer the noodles and ricotta with black olives and spinach. I usually take out the olives and add other roasted veggies - whatever I have on hand, really.

 For this lasagna, I used roasted eggplant in place of spinach, because that's what I had on hand.

For the roasted cauliflower ricotta, you will need:
1 medium-size head cauliflower chopped into half-inch pieces
2 tsp olive oil
1/2 tsp salt
1 lb extra-firm tofu
1/4 cup nutritional yeast
2 TBSP freshly squeezed lemon juice
freshly ground black pepper
1/4 cup roasted garlic
Preheat the oven to 400 degrees. First, chop the cauliflower into bite-sized pieces. Spread evenly on a cookie sheet and lightly drizzle with olive oil. Bake for about 45 minutes (I like to sprinkle it with Italian spices first, but you can leave them out if you prefer). With about 10 to 15 minutes left, add the garlic to your cookie sheet. When done, the cauliflower will be soft and mushy and a beautiful golden color.

Let the cauliflower cool until you can handle it. The original recipe tell you to mix the tofu and cauliflower with your hands, but if you put them into the blender with the garlic, salt, pepper, nutritional yeast, and lemon juice, you'll get a consistency more like ricotta.

You'll also need some of my Super Easy Marinara sauce or the tomato sauce of your choice.

To assemble, cover the bottom of a 9x13" baking dish with a thin layer of marinara. On top of that, place a layer of lasagna noodles. I prefer to use the whole wheat variety that you have to pre-cook, but I'm sure you could also use the kind that cook while they bake. Next, add a layer of ricotta, followed by whatever roasted veggies you like OR layer on fresh, uncooked spinach. Repeat with sauce, noodles, ricotta and veggies until you fill the pan. Top off with noodles and sauce and be sure to save a little ricotta for the very top.

Bake in a preheated 350 degree oven for about 40 minutes or until the top is browned. You'll want to let it cool for at least 10 minutes before serving, if you'd like to keep the roof of your mouth in tact.

Enjoy!

Wednesday, May 18, 2011

S'More Cake!

I hope you're not all caked-out by now because I saved the best for last...s'more cupcakes!


These were mom's special request for her birthday a few weeks ago and, because I wanted to share in the fun, I modified the recipe to make it vegan. Admittedly, some of the ingredients are difficult to come by, so it you choose to stick with the original recipe, I will totally understand, so I'm posting both for you.

Before you eat these you should know that they are VERY messy. If I were you, I'd strictly eat them with a fork, unless you have a friend to hose you down afterward.

For the original recipe you'll need:
1/2 cup shortening
1/4 cup butter, softened
1 cup sugar
3 eggs
1 tsp vanilla extract
2 3/4 cups graham cracker crumbs
(they sell these in a box, so don't crumble up perfectly good graham crackers)
3 tsp baking powder
1 can (12oz) evaporated milk

For the vegan version you'll need:
1/2 cup Earth Balance vegan shortening
(yes, I was also amazed this existed)
1/4 cup Earth balance marganine
(I like the one that comes in sticks, like butter, because it's easy to measure)
1 cup sugar 
(I used Sun Crystals)
EnerG Egg Replacer equivalent to 3 eggs
1 tsp vanilla
(Use the real stuff, the fake kind pales in comparison)
2 3/4 cup graham cracker crumbs
(You'll need to check the ingredients of your graham crackers to make sure they don't include honey. If you eat honey, go ahead and use the boxed crumbs. Otherwise, you'll need to get the vegan-friendly kind and whirl them through the food processor.)
3 tsp baking powder
12 oz coconut milk 
(Use the kind in the can, it is thick and will act more like evaporated milk)

Preheat your oven to 350 degrees and prepare your cupcake tins with paper liners.

In a large bowl, cream together the shortening, margarine, and sugar until it is light and fluffy. Add the eggs or Egg Replacerand beat well - it'll get almost frothy. Next, beat in vanilla until combined.

In a separate bowl, whisk together the graham cracker crumbs and baking powder.

Add the graham cracker crumbs and the milk to the shortening mixture in three small batches, alternating crumbs, then milk, then crumbs, etc.

Next, distribute the batter evenly among the cupcake tins. If you don't already have a handy little scop for this, you can use a spoon or an old-fashioned ice cream scoop. I have a set of three scoops from Pampered Chef and I use them for everything. For cupcakes, I use the largest of the three.

If you do the vegan version, the batter is incredibly light and airy. When you spoon it into the cupcake tins, be aware that it isn't going to rise very much, so you can really fill up each cup...otherwise you get shrimpy little cakes.

Bake at 350 for 20-25 minutes. If you use the traditional recipe, you will take them out after about 20 minutes; if you go the vegan route, you'll want to bake them closer to 25 minutes.

After you remove them from the oven and the baking tins, let them sit out to cool on a wire rack. You'll want them to cool completely before you frost them or you'll have a big, soupy, marshmallow-y mess.

The frosting is my favorite part of these little delights, as it is basically home-made marshmallow fluff. If you're not interested in making your own fluff from scratch, you can certainly take the easy route and use the store-bought variety but I think you'll completely fall in love with the homemade version, so give it a try if you've never made it before. For my lazy vegan friends, feel free to use Ricemellow Creme - it's a vegan substitute for fluff and it's a great time saver.

For the regular fluff, you'll need:
1 cup sugar
1/3 cup water
2 egg whites

Combine the sugar and water in a small saucepan and stir over medium heat until the sugar is dissolved. Boil it on medium to medium-high heat, uncovered, without stirring, for about five minutes.  If you have a candy thermometer, it should reach 240 degrees. If not, look for lots of little bubbles, the syrup should be clear and thick - do not let it turn color, that means it's caramelizing.

Remove the syrup from the heat and let it sit until there are no more bubbles.

While the syrup cools, beat your egg whites until soft peaks form. The original instructions tell you to stop at soft peaks but I like to beat the egg whites until they're somewhere past soft peaks but not all the way to stiff peaks - otherwise the fluff is really runny and soupy.

While the mixer is running and you've achieved soft peaks, add the hot syrup all at once - be sure to do this as quickly as possible! If you try to do it gently you will splatter hot sugar syrup all over yourself and your kitchen. Beat on high for about ten minutes. The egg whites and syrup will combine to look like fluff almost instantly but you really need to beat in a lot of air and let the mixture cool before it's ready to use. After the beating is done, it's ready to plop in tablespoonfuls on top of your cupcakes! Top with chocolate chips (I like the minis) and enjoy!

For the vegan fluff, you'll need:
5TBSP soy protein isolate 90%
(you can find this at your friendly neighborhood health food store)
2 tsp Baking Powder
1/4 tsp guar gum
3/4 cup cold water

All the above ingredients act like the egg whites from the "regular" recipe. You'll want to combine the dry ingredients in your stand mixer, mix thoroughly, and then add the water and mix until soft peaks form. If you've done this with egg whites in a past life, don't expect this mixture to get as big and fluffy as they did, because it'll just disappoint you. You will get soft peaks, though, so don't worry - it'll work out in the end.

Next you'll need:
1 1/2 cups raw sugar
1 cup light corn syrup
1/2 cup water
1 TBSP Genutine Vegetarian Gelatin
(I know, you went vegan and never thought you'd again get to have anything like jell-o, right?)
2 tsp vanilla extract
(use the good stuff, not the fake kind)

In case you hadn't already realized it, this next set of ingredients acts as your sugar syrup from the other recipe.  To start, combine the sugar and Genutine in a saucepan and whisk together quickly - it will get very thick. Next, add the corn syrup and heat over medium heat, stirring frequently. If you're using a candy thermometer, you want to get the mixture to 230 degrees (no, that's not a typo, since you're using different ingredients, you're looking for a different temperature than in the first recipe). If you're not using a thermometer, you want to get the sugar syrup to be really thick and gloppy. You'll know you're there when you can stir the syrup and it will separate, revealing the bottom of your saucepan. 

Once this happens, take it off the heat immediately! Lastly, stir in the vanilla. Be aware, this is the sticky-est, gloppy-est, messy-est thing you may ever make, so be careful not to get it on you or your kitchen.

Just like in the "normal" version, add this to the "egg" white mixture as fast as you can and mix on high speed. Let it run on high for ten minutes, until very fluffy and cool. This is now ready to use!  Plop by tablespoonfuls onto your vegan cupcakes, top with chocolate chips or carob chips and enjoy!
 
 
The recipe for vegan fluff came from a blog called "Vegan Marshmallows" but I think he got it from somewhere else. It's step one of making your own vegan marshmallows, so if you want real vegan s'mores and want to make your marshmallows from scratch instead of buying them, follow the rest of the recipe on his blog - they are wonderful! (The store-bought kind aren't bad, either.)
 
Of course, you could skip both recipes for homemade fluff, like we talked about earlier, and just top your cupcakes with regular marshmallow fluff OR Ricemellow Creme and they'd still be pretty good.

Monday, May 16, 2011

Any Fruit Coffee Cake

As I have mentioned, Amanda and Mark had this fabulous idea to have a dessert bar instead of just a wedding cake. They accomplished this with a little help from friends and loved ones!


Because we adore them, many of us agreed to pitch in and make a couple of the tried-and-true family recipes that they had chosen for the day. I love that they wanted their families and friends represented in their desserts!


Aside from their wedding cake and the German Chocolate cake, I also made a delightful blueberry coffee cake. As the name of the recipe suggests, this can be made with any fruit (although the recipe does give some suggestions).


You will need:


4 cups of fruit


(chopped apples, apricots, peaches, blackberries, blueberries)


1 cup water


2 TBSP lemon juice


1 1/4 cups sugar


1/3 cup cornstarch


3 cups flour


(I used Bob's Red Mill Gluten-Free All Purpose flour)


1 cup sugar


1 TBSP baking powder


1 tsp salt


1 tsp ground cinnamon


1/4 tsp ground mace


1 cup butter or margarine


(I used Earth Balance)


2 slightly beaten eggs


(I used EnerG Egg Replacer)


1 cup milk


(I used almond milk, because that's what I had on hand)


1 tsp vanilla


1/2 cup sugar


1/2 cup flour


1/4 cup butter or margarine


1/2 cup chopped walnuts


In a saucepan, combine your fruit and the water. Simmer it, covered, for about 5 minutes or until the fruit is tender. Stir in the lemon juice. 


Mix together the cornstarch and sugar and stir into the fruit mixture. Cook and stir until thinckened and bubbly. Remove from the heat and let cool.


In a mixing bowl, stir together the 3 cups of flour, 1 cup of sugar, baking powder, salt, cinnamon, and mace. Cut in the 1 cup of Earth Balance until it gets crumbly and is fully incorporated. 


In a separate bowl, combine Egg Replacer, milk and vanilla. Add it to the flour mixture and mix until blended.


Spread half of the batter into a greased 9x13" pan. Spoon the cooled fruit mixture over the batter and spread it out to the edges. Spoon the remaining batter into small mounds over the fruit mixture and spread out as much as possible. 


Combine the 1/2 cup of sugar and the 1/2 cup of flour and cut in the 1/4 cup of Earth Balance until the mixture resembles coarse crumbs. Stir in the nuts (if using), and sprinkle the mixture over the batter in the pan.


Place the pan on a cookie sheet and bake at 350 for 40-50 minutes or until the cake tests done. You'll want to use the cookie sheet so you don't get fruit goo all over your oven when this bakes and bubbles over...trust me on this one.


As I said, I made this with blueberries but this time of year it would be wonderful with rhubarb and strawberries.

Monday, March 28, 2011

Defensive Omnivore Bingo

I know I've tweeted this already, but I love it and need to share for those of you who don't follow my tweets.


I think I have received some form of each one of these "arguments" against going vegetarian or vegan.

There could be a fill-in-the blank category solely for "How do you get your __________?"

My personal favorite, though is, "Describes some extremely unlikely hypothetical scenario in which you'd be forced to eat meat to survive."

A close second favorite is, "Something irrelevant about cavemen."

Enjoy!

Chart via @VeganDotCom

Wednesday, March 23, 2011

Veggie Quiche

One of the first things I made after deciding not to eat meat, eggs, or dairy was a veggie quiche....mostly because I wanted to see if I could do it without eggs or milk.

The first was so bad that the boyfriend and I each took one bite and threw it right into the garbage. After a few experiments, though, I have it down and am happy to share my take on a Vegan Veggie Quiche.

You will need:

1 frozen whole wheat pie crust 
(vegan friendly, of course)
1 package extra firm tofu
1/2 cup nutritional yeast
1/2 cup Daiya cheddar shreds 
(it's not cheese, it's made from peas and nuts and it tastes great)
1 package veggie soup mix
(make sure it is vegan friendly)
1 tsp sea salt
1 1/2 tsp black pepper
1 bag frozen organic spinach
8 oz. sliced mushrooms
1/2 red bell pepper, chopped
1/2 green bell pepper, chopped
3-4 cloves of garlic, diced
3 TBSP olive oil
Paprika for garnish
(not sweet paprika)

First, a word about nutritional yeast. If you've never heard of this ingredient, you'll want to look for it in the bulk section of your grocery store.It's not yeast like you might be familiar with from baking because it is a deactivated yeast (it doesn't help anything rise). It has a cheesy, nutty flavor. A photo below:


Before preparing any of your ingredients, partially cook your pie crust according to package directions, usually about 15 minutes. Use a fork and make a few little pricks in the crust.  If you don't, it gets all puffy and then you can't put as much into it.

Since frozen pie crusts generally come in packs of two, you can double the filling to make two quiches and freeze one for a day you don't have time to cook or just plain don't feel like it!

In a large skillet over medium heat, sautee the onions in the oil until soft. When soft but not browned, add the peppers and mushrooms and cook until all ingredients are soft and lightly browned. Last, add the garlic and spinach and cook until the spinach is thawed and most of the liquid has evaporated.


While your veggies and pie crust are cooking, you have plenty of time to prepare your "egg" mixture.

Into a food processor, add tofu, nutritional yeast, "cheddar," veggie soup mix, salt and pepper. Blend until thoroughly combined.


In a large bowl, mix together the veggie mixture and the tofu mixture, using a large spoon. The tofu mixture is very thick, so it may take you a few minutes to get it combined. Trust me, you want to use extra firm tofu. There is enough liquid in the veggies to make this fluffy. If you use firm tofu instead, the whole quiche is too runny and doesn't hold up when you try to cut it.

Pour mixture into your pie crust and sprinkle with paprika. Bake for about 45 minutes at 375. Remember, every oven is different, so you may need a to adjust the time for your oven.


Not only is this a great recipe for vegetarians and vegans, but it's also great if you're trying to eat less fat and cholesterol.

Monday, March 21, 2011

Taco Night!

Since deciding not to eat meat, eggs, or dairy, I've definitely been in transition mode. No, I'm not still dabbling in dairy products now and then - I'm finding ways to modify "regular" food so that it still fits within my new food guidelines.

This starts, as you might imagine, with reading literally every ingredient on everything you buy in the grocery store. The first time I went shopping with a vegan friendly lens, it took me almost three hours to go through my list. Thankfully, it has gotten easier since then!

But I digress...

I've read that this "transitional" phase happens to a lot of people. Basically, instead of making totally new foods, you just modify food you're comfortable with. This recipe for seitan tacos is just such a recipe.

In case you're not familiar with seitan (pronounced SAY-tahn) it is a great meat substitute that's made of wheat gluten. It's available in the grocery store but you can make it yourself. Making it yourself lets you control the flavor, since you season it exactly how you want it, and it's much less expensive! I'll show you how to make it in a future blog but for now, just check out the tacos!

You will need:
1 package of taco shells
Seitan, ground
(equivalent to one pound of ground meat)
1 package of taco seasoning 
(be sure it's vegan friendly)
Avocado, sliced
Tomatoes, diced
Lettuce 
(some people like it shredded, I don't - make it however you like)
Vegan shredded "cheese"
Vegan sour "cream" 
(yes, there is a substitute!)

...and whatever else you like to put in your tacos...

Start by sauteing your seitan in a little oil or Earth Balance (it's a non-hydrogenated buttery-tasting spread). Seitan comes precooked, so you're really only heating it up and adding spices. 

If you're using your own seitan, just fling it in the food processor until it's ground into crumbles.

Isn't it crazy how much this looks like ground meat?

Add your seasoning and stir until combined. Cook until it s completely heated through.


While that heats, make sure all of your other ingredients are prepared for your tacos.

Then assemble and enjoy!

A few notes:
This is the kind of thing that's super kid-friendly and also works as "guy food." Also, if you're doing the vegetarian thing and are hosting friends for dinner who are carnivores, make this for them and they won't notice the difference...especially if you make your own seitan because you can season it however you like. I love sneaking veggie meals in where no one expects them!

Tuesday, March 15, 2011

Vegan Corned "Beef" Seitan

Growing up, my dad used to tell me a story about a very memorable St. Patrick's day during his childhood.  Dad attended an Irish Catholic grammar school and was the only kid in school who was not of Irish descent (Dad's side is Scottish, English, and Slovene, but not Irish). Year after year, Dad would recount to me the story of one St. Patrick's day when his mother sent him to school in an orange shirt. As you might imagine, the nuns were displeased.

Since everyone's Irish on St. Patrick's Day, I thought I'd get into the spirit by coming up with a vegan menu to celebrate the day. Unfortunately, the boyfriend is serving in the National Guard in KY until late Thursday night (boo) so we'll be having our own little St. Patrick's Day feast on Friday.

We'll be having:
Vegan Corned "Beef" Seitan Sandwiches
and
Chocolate Guinness Pudding

All vegan, of course.

If you've never made your own seitan, let me first say that this particular version has a ton of ingredients. Usually when I make seitan it is much simpler but this really needs to taste as much like corned beef as possible and, in order to do that, you really need to get the depth of flavor from the spices that are in traditional corned beef. Also note, if you've made seitan at home before, this is the kind of seitan you don't have to rinse. If that means nothing to you at all, don't worry - we'll cover it in a future blog.

For the seitan, you will need:

1¼ c wheat gluten
½ tbsp mustard
½ tbsp pepper
1 tsp coriander
1 tsp salt
½ tsp cloves
½ tsp red pepper
½ tsp cinnamon
½ tsp allspice
1 c cold water
½ c kidney beans, mashed
2 tbsp oil
½” ginger root, grated
1 clove garlic, minced
1 tbsp brown sugar
1 tbsp tomato paste

Preheat oven to 325°. 

In a small bowl, mix together all of your dry ingredients: wheat gluten, mustard, pepper, coriander, salt, cloves, red pepper, cinnamon, and allspice. 

In a medium bowl, mix together all of your wet ingredients. 

Next, mix together the wet and dry ingredients. I usually start with a big wooden spoon and then, when I just can't get it to mix any further, I turn the whole mess out onto my counter and finish mixing it with my hands. You want to be sure to keep kneading everything together once it is all mixed because that helps to activate the gluten.

Shape dough into a log about 10 inches long and roll tightly in aluminum foil (you can double roll it if you have to). Twist the ends to seal. 

Bake it for an hour and fifteen minutes. Turn it once, about half way through. 

After you remove it from the oven, be sure to let it cool completely. You can then slice it and make it into sandwiches. It's actually easier to cut it into really thin slices if you let it cool in the fridge first. Of course, if you were going for the more traditional "corned beef and cabbage" route, then by all means, slice it when it's still warm and serve with cabbage.

If your knife skills simply don't allow you to cut really thin slices (or if your knives are dull and you need to invest in new ones, like I do), I would suggest using your mandolin to make nice, even slices for your sandwiches.
You can serve this on whatever bread you like. I think soda bread would be more traditionally Irish but it would also be great on pumpernickel or the classic rye (which both make me think of many trips to Jewish delis with my father and not anything remotely Irish). I like mine with plenty of mustard but you could easily add sauerkraut and make it into a Reuben. 

Look for the Chocolate Guinness Pudding recipe tomorrow!

Recipe from Hell Yeah It's Vegan.

Sunday, March 13, 2011

Blessed are the cheesemakers...


Er, rather, blessed are the uncheese makers.

Many new converts to vegetarianism or veganism will tell you that they have no issue giving up dairy products, but cheese is quite another story. 

THANK GOD for Jo Stepaniak, author of The Ultimate Uncheese Cookbook.

I just received my copy in the mail and I want to make every recipe in the book!

Why uncheese?

Because, readers, I like you. Because I want you to live a long, fulfilling life. Because I want you to eat great food. Because eliminating animal proteins from your diet is the single most important change you can make to increase your chance for a long, healthy life.
But we'll talk more about that in future posts.

The book includes these categories:
Uncheese Spreads, Dips, Pestos, and Sprinkles
Cheezy Hot and Cold Sauces
Fondues
Pasta, Polenta, and other Main Dishes
Quiches, Dinner Pies, Casseroles, and Souffles
Pizzas, Breads, Little Bites, and Sandwiches
Salads and Dressings
Block Uncheeses
Sweets

Most of the recipes are also Gluten Free and Corn Free. Many of the recipes offer substitutions also take allergies into concern and offer alternative ingredients to make the uncheeses Soy Free, Nut Free, and Yeast Free. Isn't that delightful?

Go out any buy it for yourself, folks. You'll be happy you did!

Friday, March 11, 2011

Marinated Oranges in Grand Marnier Sauce


Did you ever wonder why it's a tradition to give citrus as a Christmas gift? 

It's because citrus fruits are in season in the winter.

This is one of my favorite desserts to make during the winter, when foods are so heavy. It is bright and fresh and the perfect sweet, light ending to a yummy stick-to-your-ribs winter meal.

You will need:
6 oranges (seedless are best)
1 tsp agave (or use honey, if you're into that)
1TBSP water
1/4 tsp cinnamon
2 slices of lemon peel (1-inch long each)
1/4 cup Grand Marnier

First, start by cutting the peel off of the oranges.

Then, while holding the orange over a bowl, cut out each  segment from the oranges.


You want to be sure to catch all of the juice from your oranges because you'll be using it for your sauce in a few minutes.

After you've cut all of the oranges into segments, squeeze what is left of the oranges (I refer to it as the carcass, but you can call it whatever you like) into the same bowl. You want to get as much juice as you can because the sauce is going to reduce quite a bit when you cook it.

Once you've completed your work with the oranges, drain out any juice so that you can use it in your sauce.


Now it's time for the best part - the sauce!

In a small saucepan, combine the water, Grand Marnier, honey or agave, cinnamon, and lemon peel. Add all of the juice you drained out of the oranges.

Be careful to only get the yellow part of the peel. The white pith is really bitter.

Boil over medium heat until the liquid reduces by half. This should take about 3 minutes and you'll know it's done because it will look syrupy.

As I mentioned above, this makes a great light dessert after a big winter meal. You can also make this with grapefruit or you can combine oranges and grapefruit together.

Wednesday, March 9, 2011

Spicy Pasta with Broccoli

 
By far one of the best vegan dishes I've made, this recipe comes together very quickly.
It also calls for the most garlic of any recipe I've ever seen.

You can add more or less red pepper flakes depending on how spicy you like things. If you don't like spicy food, you may want to add just a sprinkle of the red pepper flakes.

For this quick, easy dinner you will need:

1/2 lb of organic whole wheat pasta 
(like linguine, fettuccine or spaghetti)
2 tsp olive oil
1/4 cup thinly sliced garlic
3 colves of garlic, minced
1/2 tsp red pepper flakes
1 tsp dried thyme
1 cup vegetable broth
1/2 cup of dry white wine
1/2 tsp salt
4 cups broccoli florets, cut into bite sized pieces
2 tsp balsamic vinegar
(I actually leave this ingredient out sometimes and I think it's just as good both ways)
plenty of freshly ground black pepper for serving

Bring a large pot of salted water to a boil. 

While your water heats, prep your ingredients....it takes a while to slice all that garlic!

Once the water boils, add the pasta and cook according to package directions.

Preheat a large nonstick skillet over medium heat. Saute the garlic , red pepper flakes, and thyme in the oil for about a minute. Be careful not to burn it.

Stir in the vegetable broth, wine, and salt. Add the broccoli, turn up the heat to bring to a simmer, and cover the pan. Cook for 8 to 13 minutes, depending on how soft or firm you like your broccoli. Stir occasionally. 

When your pasta is done cooking, drain and add to the broccoli mixture. Stir with a pasta spoon until thoroughly mixed, about 3 minutes.

I serve it with a healthy dose of freshly ground black pepper. When you portion it out, be sure to get all of the garlic out of the skillet because it likes to get left behind.

Happy eating!

Recipe adapted from Appetite for Reduction

Monday, March 7, 2011

Greek salad with Vegan Feta


The one and only thing I've been missing since going vegan is feta cheese. 

Salty, briny, soft feta cheese...oh, how I miss you....

Or, rather, how I missed you until I came up with my own vegan feta!


You will need:

1 package of extra firm tofu 
(I like to use the Nasoya Cubed Super Firm Tofu)
1 1/2 TBSP apple cider vinegar
1 1/2 TBSP red wine vinegar
3-4 tsp liquid from olives
(sine you'll be using olives in your salad, you'll have this on hand)
1 tsp dried basil
1 tsp dried oregano
1 tsp fresh garlic, minced
2 TBSP tahini
1 TBSP lemon juice

First, you'll want to drain the tofu as it's packed in water. 

Be sure to squeeze out any excess water by pressing the tofu between paper towels.

In a small bowl, whisk together the other ingredients until thoroughly combined.  

Add the tofu to the bowl and stir a few times until it is entirely coated with the "feta" mixture.

Let sit in refrigerator to marinate for at least an hour before adding to your salad.


For your Greek salad you'll need:

Crisp, yummy romaine lettuce
1 Roma tomato, cut into small cubes
A few slices of cucumber
A few slices of thinly sliced red onion
A spoonful of Greek olives 
(or more if you like)
A heaping spoonful of my vegan feta
2 or 3 peperoncini 
(These are optional. I know tons of Greek salad fiends who leave them out.)

Assembly is definitely up to you so use the ingredients "how much you like it."

I dress my Greek salads with Annie's roasted garlic dressing and a little splash of red wine vinegar (you know, since it's handy from making the feta).

Hope you enjoy and be sure to share with your non-veggie friends. 

Happy eating!

Saturday, March 5, 2011

Vegan Pancakes

Don't you just want to eat breakfast three meals a day? I certainly do. If I had my own restaurant, breakfast would definitely be available all day - just like one of those greasy spoons. YUM!

Few breakfast dishes satisfy me quite the way pancakes do. For years I've stuck to Betty Crocker's "Favorite Pancakes" recipe for fluffy, moist buttermilk pancakes. Alas, that recipe requires eggs and buttermilk, which are now a thing of the past.

I cannot tell you how happy I was to stumble upon this recipe for pancakes that don't require any animal products and are just as delicious as the old-fashioned kind.  

Warm up your maple syrup (the real kind, not that Mrs. Butterworth nonsense) and get ready for the best breakfast you've had in a long time.

You will need:

1 1/2 cups plus two TBSP whole wheat pastry flour
1 1/2 tsp baking powder
1/2 tsp fine sea salt
1 1/2 cups nondairy milk (I use soy)
2 TBSP refined coconut oil, melted
1 TBSP maple syrup, plus more for serving
1 tsp pure vanilla extract

In a large bowl, whisk together the dry ingredients.

In another bowl, mix together wet ingredients (except coconut oil).

Add the wet ingredients to the dry ingredients and combine until just mixed, lumps are ok.

Next, melt the coconut oil and add it to the batter.

In case you aren't familiar with coconut oil, it comes in a jar and looks a little like Crisco.

You want to be sure not to add the melted coconut oil to the other wet ingredients because they are cold and the coconut oil will harden on contact.

Once all ingredients are combined, drop by 1/4 cup blobs onto a preheated skillet. If your skillet isn't one of the non-stick variety, be sure to use a little of the coconut oil or some earth balance so your pancakes don't stick.


Cook until bubbles appear, the edges are set, and the pancakes are a nice golden brown on the bottom. Flip and cook until the other side is browned.

If you're making lots or you have a small skillet, you can keep them warm in a 250 degree oven.

Serve hot with plenty of maple syrup.

Do your body a favor and use organic ingredients whenever possible. 

Recipe modified from Skinny Bitch in the Kitch

Thursday, March 3, 2011

V is for...

After my last post about becoming vegan, I had every intention of writing about how veganism is so amazing and WAY more healthy than eating animal-derived products....and while I still have every intention of telling you all of the information that you probably already know, I want to ease you in.

The way I see it is this:  

If I tell you all of the nitty-gritty details right off the bat, I'm going to lose your attention, probably offend you, and drive you so far away from even considering a vegan or vegetarian lifestyle that you'll go knock over a taco Bell in an effort to get a full 180° away from vegetables.  

And I just can't let that happen.

In an effort to entice you a little, I'm going to offer you a few delectable dishes.  They're so satisfying that you'll never again ask, "Isn't being vegan really hard? What do you mean you don't eat cheese? How do you get your protein (calcium, vitamin D, blah, blah, blah)?"

I assure you, after a week or two of these recipes you'll be ready to hear all of the details about what's really in your food and why an organic, vegetable based diet is the way to go. And then, when you're ready to listen, you can sit back with a big mug full of organic, decaf green tea and a couple of wheat-free, dairy-free Fig Newman's and be open to what I have to say.

Since breakfast is my favorite meal of the day, we'll start there in my next post.

Happy eating!
Related Posts with Thumbnails