Showing posts with label Desserts and Treats. Show all posts

Monday, June 20, 2011

Flat Chocolate Chip Crackers

Do you ever have those days where you just NEED a chocolate chip cookie? 

Silly me, of course you do.

I've been on the hunt lately for a vegan chocolate chip cookie recipe lately that actually meets my approval. I've tried several overthe past few weeks to no avail -Skinny Bitch in the Kitch, Babycakes (x2), and a few versions I found online - and they all fall flat. I mean this literally, of course, as they all end up like flat, hard, crunchy chocolate chip crackers. They're all truly horrible!

Back before I went vegan I had a truly marvelous recipe for chocolate chip cookies. They were crunchy on the edges and soft and chewy in the middle without being so soft they were under cooked. They were puffy and didn't spread out and glom onto their neighborswhen you baked them.

I am jonesing for my old cookie recipe in a bad way.

I've been trying to experiment with ways to veganize the old recipe to no avail. 

Please help:  

If you know a really wonderful chocolate cookie recipe (or a recipe for a cookie base that I could use for multiple cookies - that would be fantastic) please share! 

Leave it as a comment or e-mail me at rn6productions@gmail.com.

I'm desperate!

Friday, May 27, 2011

I need summer NOW

I am jonesing for summer in a bad way.

Thanks to weeks of rainy, unseasonably cold weather, I am craving food on the grill, corn on the cob, long days spent at the beach, and hot summer nights with friends enjoying a couple of beers on the deck at our favorite local hangout.

I live in the frozen white north, so this time of year makes me crave food I don't get to eat the rest of the year....lately that's been s'mores.
Ever since my post on S'More Cupcakes, I have had my sight locked onto these sweet, gooey delights. I am dying for all of this rain to end so I can get out therewith friends and roast some of these up over a fire! 
When the day finally comes that the clouds roll away and it's dry enough to start a fire, I will be ready! I recently discovered that I don't have to kill myself making vegan marshmallows from scratch - instead I can buy Dandies Vegan Marshmallows!


They're vegan, gluten free, and gelatin free! Now I'm sure that tons of you veggies out there already know all about these little guys but I am new to the scene. I cannot tell you  how happy I was to stumble upon these when poking around online for recipes to make my own vegan marshmallows. I literally squealed with joy!

Another fun reason I'm dying to make s'mores?

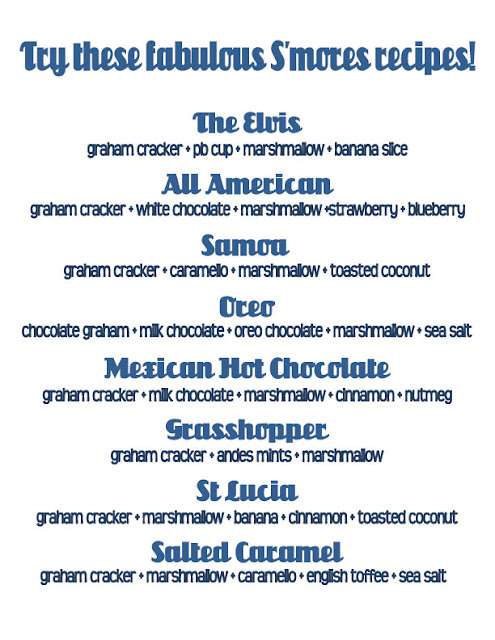
I've had this post for a do-it-yourself S'Mores Bar from Birthday Girl Blog bookmarked for ages. 
Don't those combinations sound like fun? Yes, I realize that vegan-izing some of them could be a real challenge but after finding a vegan marshmallow alternative, I'm ready to tackle pretty much any of them!

Hopefully summer will arrive soon so I can have a little soiree!

Download PDFs of S'mores Bar Party here

Wednesday, May 18, 2011

S'More Cake!

I hope you're not all caked-out by now because I saved the best for last...s'more cupcakes!


These were mom's special request for her birthday a few weeks ago and, because I wanted to share in the fun, I modified the recipe to make it vegan. Admittedly, some of the ingredients are difficult to come by, so it you choose to stick with the original recipe, I will totally understand, so I'm posting both for you.

Before you eat these you should know that they are VERY messy. If I were you, I'd strictly eat them with a fork, unless you have a friend to hose you down afterward.

For the original recipe you'll need:
1/2 cup shortening
1/4 cup butter, softened
1 cup sugar
3 eggs
1 tsp vanilla extract
2 3/4 cups graham cracker crumbs
(they sell these in a box, so don't crumble up perfectly good graham crackers)
3 tsp baking powder
1 can (12oz) evaporated milk

For the vegan version you'll need:
1/2 cup Earth Balance vegan shortening
(yes, I was also amazed this existed)
1/4 cup Earth balance marganine
(I like the one that comes in sticks, like butter, because it's easy to measure)
1 cup sugar 
(I used Sun Crystals)
EnerG Egg Replacer equivalent to 3 eggs
1 tsp vanilla
(Use the real stuff, the fake kind pales in comparison)
2 3/4 cup graham cracker crumbs
(You'll need to check the ingredients of your graham crackers to make sure they don't include honey. If you eat honey, go ahead and use the boxed crumbs. Otherwise, you'll need to get the vegan-friendly kind and whirl them through the food processor.)
3 tsp baking powder
12 oz coconut milk 
(Use the kind in the can, it is thick and will act more like evaporated milk)

Preheat your oven to 350 degrees and prepare your cupcake tins with paper liners.

In a large bowl, cream together the shortening, margarine, and sugar until it is light and fluffy. Add the eggs or Egg Replacerand beat well - it'll get almost frothy. Next, beat in vanilla until combined.

In a separate bowl, whisk together the graham cracker crumbs and baking powder.

Add the graham cracker crumbs and the milk to the shortening mixture in three small batches, alternating crumbs, then milk, then crumbs, etc.

Next, distribute the batter evenly among the cupcake tins. If you don't already have a handy little scop for this, you can use a spoon or an old-fashioned ice cream scoop. I have a set of three scoops from Pampered Chef and I use them for everything. For cupcakes, I use the largest of the three.

If you do the vegan version, the batter is incredibly light and airy. When you spoon it into the cupcake tins, be aware that it isn't going to rise very much, so you can really fill up each cup...otherwise you get shrimpy little cakes.

Bake at 350 for 20-25 minutes. If you use the traditional recipe, you will take them out after about 20 minutes; if you go the vegan route, you'll want to bake them closer to 25 minutes.

After you remove them from the oven and the baking tins, let them sit out to cool on a wire rack. You'll want them to cool completely before you frost them or you'll have a big, soupy, marshmallow-y mess.

The frosting is my favorite part of these little delights, as it is basically home-made marshmallow fluff. If you're not interested in making your own fluff from scratch, you can certainly take the easy route and use the store-bought variety but I think you'll completely fall in love with the homemade version, so give it a try if you've never made it before. For my lazy vegan friends, feel free to use Ricemellow Creme - it's a vegan substitute for fluff and it's a great time saver.

For the regular fluff, you'll need:
1 cup sugar
1/3 cup water
2 egg whites

Combine the sugar and water in a small saucepan and stir over medium heat until the sugar is dissolved. Boil it on medium to medium-high heat, uncovered, without stirring, for about five minutes.  If you have a candy thermometer, it should reach 240 degrees. If not, look for lots of little bubbles, the syrup should be clear and thick - do not let it turn color, that means it's caramelizing.

Remove the syrup from the heat and let it sit until there are no more bubbles.

While the syrup cools, beat your egg whites until soft peaks form. The original instructions tell you to stop at soft peaks but I like to beat the egg whites until they're somewhere past soft peaks but not all the way to stiff peaks - otherwise the fluff is really runny and soupy.

While the mixer is running and you've achieved soft peaks, add the hot syrup all at once - be sure to do this as quickly as possible! If you try to do it gently you will splatter hot sugar syrup all over yourself and your kitchen. Beat on high for about ten minutes. The egg whites and syrup will combine to look like fluff almost instantly but you really need to beat in a lot of air and let the mixture cool before it's ready to use. After the beating is done, it's ready to plop in tablespoonfuls on top of your cupcakes! Top with chocolate chips (I like the minis) and enjoy!

For the vegan fluff, you'll need:
5TBSP soy protein isolate 90%
(you can find this at your friendly neighborhood health food store)
2 tsp Baking Powder
1/4 tsp guar gum
3/4 cup cold water

All the above ingredients act like the egg whites from the "regular" recipe. You'll want to combine the dry ingredients in your stand mixer, mix thoroughly, and then add the water and mix until soft peaks form. If you've done this with egg whites in a past life, don't expect this mixture to get as big and fluffy as they did, because it'll just disappoint you. You will get soft peaks, though, so don't worry - it'll work out in the end.

Next you'll need:
1 1/2 cups raw sugar
1 cup light corn syrup
1/2 cup water
1 TBSP Genutine Vegetarian Gelatin
(I know, you went vegan and never thought you'd again get to have anything like jell-o, right?)
2 tsp vanilla extract
(use the good stuff, not the fake kind)

In case you hadn't already realized it, this next set of ingredients acts as your sugar syrup from the other recipe.  To start, combine the sugar and Genutine in a saucepan and whisk together quickly - it will get very thick. Next, add the corn syrup and heat over medium heat, stirring frequently. If you're using a candy thermometer, you want to get the mixture to 230 degrees (no, that's not a typo, since you're using different ingredients, you're looking for a different temperature than in the first recipe). If you're not using a thermometer, you want to get the sugar syrup to be really thick and gloppy. You'll know you're there when you can stir the syrup and it will separate, revealing the bottom of your saucepan. 

Once this happens, take it off the heat immediately! Lastly, stir in the vanilla. Be aware, this is the sticky-est, gloppy-est, messy-est thing you may ever make, so be careful not to get it on you or your kitchen.

Just like in the "normal" version, add this to the "egg" white mixture as fast as you can and mix on high speed. Let it run on high for ten minutes, until very fluffy and cool. This is now ready to use!  Plop by tablespoonfuls onto your vegan cupcakes, top with chocolate chips or carob chips and enjoy!
 
 
The recipe for vegan fluff came from a blog called "Vegan Marshmallows" but I think he got it from somewhere else. It's step one of making your own vegan marshmallows, so if you want real vegan s'mores and want to make your marshmallows from scratch instead of buying them, follow the rest of the recipe on his blog - they are wonderful! (The store-bought kind aren't bad, either.)
 
Of course, you could skip both recipes for homemade fluff, like we talked about earlier, and just top your cupcakes with regular marshmallow fluff OR Ricemellow Creme and they'd still be pretty good.

Monday, May 16, 2011

Any Fruit Coffee Cake

As I have mentioned, Amanda and Mark had this fabulous idea to have a dessert bar instead of just a wedding cake. They accomplished this with a little help from friends and loved ones!


Because we adore them, many of us agreed to pitch in and make a couple of the tried-and-true family recipes that they had chosen for the day. I love that they wanted their families and friends represented in their desserts!


Aside from their wedding cake and the German Chocolate cake, I also made a delightful blueberry coffee cake. As the name of the recipe suggests, this can be made with any fruit (although the recipe does give some suggestions).


You will need:


4 cups of fruit


(chopped apples, apricots, peaches, blackberries, blueberries)


1 cup water


2 TBSP lemon juice


1 1/4 cups sugar


1/3 cup cornstarch


3 cups flour


(I used Bob's Red Mill Gluten-Free All Purpose flour)


1 cup sugar


1 TBSP baking powder


1 tsp salt


1 tsp ground cinnamon


1/4 tsp ground mace


1 cup butter or margarine


(I used Earth Balance)


2 slightly beaten eggs


(I used EnerG Egg Replacer)


1 cup milk


(I used almond milk, because that's what I had on hand)


1 tsp vanilla


1/2 cup sugar


1/2 cup flour


1/4 cup butter or margarine


1/2 cup chopped walnuts


In a saucepan, combine your fruit and the water. Simmer it, covered, for about 5 minutes or until the fruit is tender. Stir in the lemon juice. 


Mix together the cornstarch and sugar and stir into the fruit mixture. Cook and stir until thinckened and bubbly. Remove from the heat and let cool.


In a mixing bowl, stir together the 3 cups of flour, 1 cup of sugar, baking powder, salt, cinnamon, and mace. Cut in the 1 cup of Earth Balance until it gets crumbly and is fully incorporated. 


In a separate bowl, combine Egg Replacer, milk and vanilla. Add it to the flour mixture and mix until blended.


Spread half of the batter into a greased 9x13" pan. Spoon the cooled fruit mixture over the batter and spread it out to the edges. Spoon the remaining batter into small mounds over the fruit mixture and spread out as much as possible. 


Combine the 1/2 cup of sugar and the 1/2 cup of flour and cut in the 1/4 cup of Earth Balance until the mixture resembles coarse crumbs. Stir in the nuts (if using), and sprinkle the mixture over the batter in the pan.


Place the pan on a cookie sheet and bake at 350 for 40-50 minutes or until the cake tests done. You'll want to use the cookie sheet so you don't get fruit goo all over your oven when this bakes and bubbles over...trust me on this one.


As I said, I made this with blueberries but this time of year it would be wonderful with rhubarb and strawberries.

Friday, May 13, 2011

Gluten-Free, Vegan German Chocolate Cake

 What was left of the cake after Amanda and Mark's reception.

I made this cake recently for Miss Amanda's wedding. She had this fantastic dessert bar made of two 8-foot banquet tables with the wedding cake as the centerpiece. The tables were packed full of brownies, cookies, cakes, cupcakes, cheesecake, homemade truffles, mini muffins, coffee cake and so much more! The idea was that the desserts would act as the wedding favors for guests and boy-o-boy were there plenty of yummy things for take home.

One challenge in all of this, of course, is that there are typically few (or no) options for us vegan kids. The same is true for several of my very good friends who do the gluten-free thing. We feel generally left out of the party because we can't enjoy the same things everyone else is having. Harumph!

Even though Miss Amanda specifically asked me to make things "the normal way," I took matters into my own hands and directly disobeyed her request. Sorry, my friend, but I wanted to have a slice of something yummy for all of my efforts - and I wanted our gluten-free pals to have options, too!

If you follow me on Twitter, you should know by now that I have a serious cook book habit...but when I stumbled upon a recipe for Babycakes' German Chocolate Cake, I knew I had to buy yet another cook book. Their recipes are, "Vegan, (Mostly) Gluten-Free, and (Mostly) Sugar-Free" and fan-fricken-tastic!

The cake part of the recipe is all Babycakes but the frosting is mine. I like their frosting recipes but they melt really quickly if not refrigerated and, since these had to sit out for much of the day while I got ready, attended the wedding, and then partied until it was time for dessert, the Babycakes frosting simply would not do.

I have no idea why German Chocolate Cake has coconut (as far as I know, coconuts don't come from Germany and never have) but it's delicious, if geographically incorrect.

For the cake, you will need:
2 cups brown rice flour
1/2 cup potato starch
3/4 cup unsweetened cocoa powder (the darker the better)
1/4 cup arrowroot
1 1/2 TBSP baking  powder
1/2 tsp baking soda
1/2 tsp xantham gum
1 tsp salt
1 1/2 cups agave nectar
1 cup melted refined coconut oil, plus more to brush onto your baking pans
1 cup unsweetened applesauce
1/3 cup vanilla extract
1/2 cup hot water

Preheat oven to 325. Brush two 9-inch round cake pans with melted coconut oil and set aside (you only have to do the bottom of the pans).

In a medium bowl, whisk together the flour, potato starch, cocoa powder, arrowroot, baking powder, baking soda, xantham gum, and salt. Add the agave nectar, coconut oil, applesauce, and vanilla and mix with a rubber spatula until fully incorporated (It's going to look more like cookie dough than cake batter - just go with it). Add the hot water and mix until a loose batter forms.

Divide the batter evenly between the two baking pans. Bake for 15 minutes and rotate. Continue baking 15 more minutes or until a toothpick inserted in the middle comes out clean.

Let the cake cool in the pans for 45 minutes. After 45 minutes, turn the cakes out onto a cake plate or wire rack and let cool one more hour (at least) before frosting. Remember, I like to let my cakes chill over night. This is definitely one of the fridge-only kinds of cakes.

For the frosting, you will need:
12 TBSP Earth Balance, softened
1/4 tsp vanilla extract
1/2 tsp coconut extract
2 cups powdered sugar
1 cup unsweetened shredded coconut
3 TBSP non-dairy milk

Just like when we made the plain buttercream frosting, you'll want to beat the Earth Balance until it is soft and fluffy. Next you'll add both extracts and beat again until combined. Add the milk and powdered sugar a little at a time and beat until combined. Once this tastes like the best buttercream frosting you've ever had, add in the coconut at the very end and mix until fully incorporated.

Frost using the techniques you learned in my last post and garnish with more shredded coconut and some pecans.

In addition to making this cake, the blueberry coffee cake, and the wedding cake, I also helped coordinate the desserts and set up the dessert bar. In all of that, the best compliment I got the whole day was from my friend Jack who, after sampling the German Chocolate Cake and the Gluten-Free, Vegan Blueberry Coffee Cake, gave me a giant hug and exclaimed, "I feel like a real boy!"

Wednesday, May 11, 2011

How to frost a cake

There are, I am sure, several ways to frost a cake. This is my way, however, and has a few tips and tricks included that really do make it easier.

In my last post I gave you the recipe for Amanda and Mark's super fudgy mocha wedding cake with buttercream frosting. YUM-O. In m next several posts there will be other cakes to try...so you're going to thank me for these helpful little time-savers.

First, once you've baked and cooled your cakes, do yourself a favor and chill them overnight. If your cake is light and fluffy, pop it in the freezer overnight; if your cake is dense or fudgy (like pound cake or the mocha cake I mentioned) then sticking it in the fridge will be better. 

Why? 

Really dense cakes are firmer to begin with. They don't need as much help getting to a solid state. Also, they'll take longer to thaw, so freezing them is like shooting yourself in the foot from the start.

OK, now fast forward to the next morning when you're going to frost the cake.

You're going to need a few things.

First, you'll want the cake board or plate or whatever you plan to serve the cake on. Get it handy.

Next, you'll want:
an offset spatula
a pastry bag...if you don't have one, get a big Ziploc bag
wax paper or parchment paper

To start, you'll want to prep your pastry bag. I think the easiest way (with the least clean up) is to fill a plastic bag with frosting and cut off the tip. No, this doesn't work for flowers and such BUT it does work to get the majority of the icing onto the cake!


I think the easiest way (without a helper) is to prop up your bag in a large container.


I like to fold the sides down so that I get the frosting inside the bag and not all over the outside of the bag...it's easier to frost the cake that way. ;)


My mom always taught me to put a little blob of frosting down on the cake plate/board before you lay the first layer down. It keeps the cake from sliding all over the place while you frost it....and it also gives you the tiniest little gap between the cake and the plate so that you can slide strips of parchment under the cake. 


 Maybe it seems obvious to you but the parchment paper keeps your cake plate clean and saves you from having to wipe gobs of frosting off of the plate before you present it to your guests or hungry family. I don't know about you but I'm not all that careful when I frost - I can use all the help there is to keep that plate clean.


Now, once you've plated the first layer and placed your parchment, you'll want to make a ring of icing around the edge. 


This helps to do two things: first, it helps to fill in the edges between the layers (which will save you a headache later if you didn't evenly trim your layers to be perfectly level); second, if you plan to use some kind of fruit filling of a filling other than the main frosting, this will help keep it in between the layers instead of squishing out the sides and ruining the rest of the frosting. 


I like to pipe the frosting generously all over the top of the cake, since that will help you frost the sides of the cake.


You'll also want to pipe some frosting around the sides of the cake, since the frosting you put on top won't  make it all the way to the bottom.


Using your offset spatula (that's the thing in the picture), spread out the frosting, starting from the top.


Once you're finished, gently and carefully pull the parchment out from under the cake and voilรก, your cake is finished and ready for presentation.

Monday, May 9, 2011

Mocha cake with buttercream frosting

Before Amanda and Mark chose a mocha cake with buttercream frosting for their wedding cake, they came over to have a taste test!

Poor kids had no idea what they were in for - I think they shared 12 cupcakes between them.

They tried combinations of the following:
Mocha Cake
Chocolate Orange Almond Cake
Chocolate Mud Cake
Neapolitan Cake
Buttercream Frosting
Marshmallow Frosting
Cream Cheese Frosting

It was a LOT of cake!

But after all of those choices, they narrowed it down to the mocha and buttercream.

The cake was two tiered, which required four times the recipe below and five times the frosting. Be advised, this is not vegan, although you could probably make it vegan with a few simple substitutions like EnerG Egg Replacer for eggs and Earth Balance in place of butter.

For the cake you will need:
1 stick plus 3 TBSP butter, chopped coarsely (or Earth Balance)
3 1/2 oz dark chocolate
1 1/3 cups sugar
2/3 cup water
1/4 cup coffee syrup
3 TBSP instant coffee granules
1 cup all-purpose flour
3 TBSP self-rising flour
3 TBSP cocoa powder
1 egg (or Egg Replacer equivalent)

Preheat your oven to 325. Butter your baking dish and dust with cocoa. DO NOT use that horrible spray junk - it's all chemicals and it doesn't work as well. See here for proof.

Combine the butter, chocolate, sugar, water, coffee syrup, and coffee granules in a sauce pan. Stir over medium-low heat until it is all combined and there are no lumps.

Remove the coffee-chocolate mixture from the heat and pour it into a bowl. Let it cool for at least 15 minutes before starting the next step.

After at least 15 minutes, sift in the flours and cocoa. Then add the egg (or Egg Replacer) and stir until combined. Be careful not to over mix! There isn't much flour in this, so the cakes don't rise very much. If you over-mix the batter you'll activate the gluten. That makes it rubbery, which is exactly what this cake does not need!

Pour into your prepped baking dished and bake for 45 minutes to an hour. You'll need to test these with a tooth pick at about 40 minutes to see how much longer you need.

Once cooked, remove from oven and let stand 5 minutes. Yeah, I know your mom always told you to let them sit for 10 BUT if you let them sit they're impossible to get out of the pan - they're basically giant mocha brownies.

For the frosting you will need:
6 TBSP butter 
(yes, you can substitute Earth Balance, but you'll want to add more powdered sugar)
1/4 tsp vanilla extract 
(or substitute it for another extract if you want to flavor it differently)
1 cup powdered sugar
1 1/2 TBSP milk (or non-dairy milk)

Whip the butter until it's light and fluffy, then add the vanilla. Mix in the milk and sugar, alternating so that you don't cover your kitchen in powdered sugar.

I like to add a little extra powdered sugar, because it helps the buttercream stay more solid. This helps if you're planning to let your cake sit out a while. This way it doesn't melt and run down the sides of your cake. If you plan to eat it right away or refrigerate it, skip the extra sugar.

I think in my next post I'll show you some tricks for frosting a cake. WAY MORE cake recipes to follow!

Wednesday, April 27, 2011

Cake, cake, and more cake!

I know I've been away for a while but I've been really busy!

Two of my dear friends got married on Saturday and I have spent the last couple of weeks coordinating the desserts for their wedding.

They had this wonderful dessert bar, complete with cookies, cheesecake bars, peanut butter brownie bars, cupcakes, homemade truffles, and so many choices of cakes.

The centerpiece of the dessert buffet was their mocha wedding cake with buttercream frosting!

The cake is super dense and fudgy - almost like a mocha brownie covered in vanilla buttercream frosting.

It was decorated with flowers to match the flowers miss Amanda used for her centerpieces and I think it came out rather well, if I do say so myself.

I also made a gluten-free and vegan German Chocolate cake and a gluten-free and vegan blueberry coffee cake.

I'll include all of my recipes in the next week or so, I just wanted to be sure that I posted something so you didn't think I'd fallen off the face of the planet!

Thursday, March 17, 2011

Chocolate Guinness Pudding

Because you can never have too much chocolate and since it is St. Patrick's Day, I thought a fun follow up to the Corned "Beef" Seitan would be a rich, creamy Chocolate Guinness Pudding.

The original recipe came from Epicurious but I have adapted it since I'm not eating eggs or dairy.
You can find the original recipe at the link above, should you want it.

To make the vegetarian version you will need:
Egg replacer equivalent to 8 egg yolks
1 cup of sugar
one 14.9 can/bottle of Guinness Draught
2 1/4 cups of vegan cream
7 ounces of bittersweet or semisweet chocolate
1 can of whole-fat coconut milk
You'll also need six old fashioned glasses (I used juice glasses because that's what I had on hand).

In a large bowl, whisk up your egg replacer. Then add sugar and whisk until combined.
Open up your Guinness and slowly pour it into a measuring cup. Be sure to pour it down the side of the measuring cup to keep it from foaming. 

Pour about half of the Guinness into a 3-quart saucepan. Add the "cream" and whisk to combine. Turn the heat up to medium and heat until bubbles begin to form at the edges. Stir it occasionally.
Remove it from the heat and add the chocolate. Whisk it together until it's smooth. 

Since you're not using eggs, return it to the heat and pour your egg replacer and sugar mixture into the beer and cream mixture. (If you were using real eggs, you'd want to pour a little of the hot beer-chocolate mixture into the eggs and sugar so that the eggs wouldn't curdle - because no one likes scrambled eggs in their chocolate.)

Turn the heat down to medium low and cook, whisking constantly, until it thickens and can coat the back of a spoon. This should take about 15 minutes.

Remove from heat and pour into your glasses. Leave at least one inch of space at the top of each glass. Cover with plastic wrap and chill in the fridge until cold and set.

So, that's half of the process. 
Next you're going to make a Guinness whipped cream to top off your pudding...you know, so they look like little glasses of Guinness. Isn't that super cute?

Pour the rest of your beer into a saucepan and bring it up to a boil over medium heat. Reduce heat to medium low and simmer, uncovered until reduced to 1 TBSP. This will take just about 20 minutes. Pour it into a small bowl and let it cool.

The original recipe tells you to whip up 3/4 of a cup of cream until soft peaks form BUT vegan cream substitutes don't whip so....you're going to have to use the fat part of coconut milk. Before you even star, be sure your coconut milk has been refrigerated. You may also want to put your mixing bowl and the beaters into the freezer.

You'll need one can of coconut milk but you don't want the water. To drain out the water, poke two holes in the bottom of the can and drain over a bowl or your sink. Once the water is removed, open the can and scoop out the fat part.

You'll want to move quickly, so that the coconut milk doesn't get too warm to whip.

Whip up the coconut milk fat in your chilled bowl. Be sure not to over whip. Coconut milk fat will break down if you whip it too much, so be sure to treat it gently.

Once your coconut milk is whipped, fold in the Guinness syrup you made earlier. Your whipped cream is only going to hold up for an hour or two, as long as it stays chilled. I suggest making this right before you are going to serve your pudding.

Top each glass of pudding with your Guinness whipped cream and enjoy!

Photo from Epicurious.com

    Friday, March 11, 2011

    Marinated Oranges in Grand Marnier Sauce


    Did you ever wonder why it's a tradition to give citrus as a Christmas gift? 

    It's because citrus fruits are in season in the winter.

    This is one of my favorite desserts to make during the winter, when foods are so heavy. It is bright and fresh and the perfect sweet, light ending to a yummy stick-to-your-ribs winter meal.

    You will need:
    6 oranges (seedless are best)
    1 tsp agave (or use honey, if you're into that)
    1TBSP water
    1/4 tsp cinnamon
    2 slices of lemon peel (1-inch long each)
    1/4 cup Grand Marnier

    First, start by cutting the peel off of the oranges.

    Then, while holding the orange over a bowl, cut out each  segment from the oranges.


    You want to be sure to catch all of the juice from your oranges because you'll be using it for your sauce in a few minutes.

    After you've cut all of the oranges into segments, squeeze what is left of the oranges (I refer to it as the carcass, but you can call it whatever you like) into the same bowl. You want to get as much juice as you can because the sauce is going to reduce quite a bit when you cook it.

    Once you've completed your work with the oranges, drain out any juice so that you can use it in your sauce.


    Now it's time for the best part - the sauce!

    In a small saucepan, combine the water, Grand Marnier, honey or agave, cinnamon, and lemon peel. Add all of the juice you drained out of the oranges.

    Be careful to only get the yellow part of the peel. The white pith is really bitter.

    Boil over medium heat until the liquid reduces by half. This should take about 3 minutes and you'll know it's done because it will look syrupy.

    As I mentioned above, this makes a great light dessert after a big winter meal. You can also make this with grapefruit or you can combine oranges and grapefruit together.

    Saturday, October 16, 2010

    Pumpkin Chocolate Chip Cookies

    I got this recipe from my friend Philip and have since modified it slightly.  

    The pumpkin in this recipe makes the cookies soft and moist, as does the oil. I prefer a cookie with a little more body, so I have substituted the oil for butter, which makes a more traditional cookie.

    You will need:

    1/2 cup olive oil (or substitute butter, softened)
    1 cup sugar
    1 cup pumpkin
    1 egg
    1 TBSP vanilla
    2 cups all purpose flour
    1/2 tsp salt
    1 tsp baking soda
    2 tsp baking powder
    2 tsp cinnamon
    1 bag chocolate chips (I like mini semisweet chocolate chips)
     
    Preheat oven to 350 degrees. Cream together butter and sugar. Add pumpkin, egg and vanilla and beat until combined. In a separate bowl combine flour, salt, soda, powder, and cinnamon. Add to cookie mixture in thirds, being careful not to over mix. 

    Mix in chocolate chips by hand with a wooden spoon or spatula.
     
    Cover cookie sheet with parchment paper. Drop teaspoon-sized balls of dough onto cookie sheets. Bake 10-12 minutes or until edges turn golden.
     
    Remove from cookie sheet to cool on wire rack. I put paper towels on top of the wire racks because they absorb some of the fat from the butter.

    Happy eating!

    Sunday, January 3, 2010

    Woof! Woof!


    Isn't this bark beautiful? I made it today.

    It's semisweet chocolate with dried cranberries, tart dried cherries, almonds, and some coconut that I "toasted" in a nonstick pan.

    Pretty AND delicious.

    - Posted using BlogPress from my iPhone

    Berry good!

    Desperate for something sweet after lunch, I whipped up this little tart. Isn't it pretty?


    Instead of a pie crust I made a meringue (like a big cookie).

    The "custard" is light cream cheese, fat free cool whip, and marshmallow cream.

    It's topped with strawberries (yes, they were frozen - but they're the unsweetened variety). I made a glaze by melting some strawberry jam with water to thin it out.


    Mom and I agreed it's a "make again."

    - Posted using BlogPress from my iPhone
    Related Posts with Thumbnails